Installation of Socket Boxes: Expert Tips & Techniques
Understanding Socket Boxes and Their Installation
Overview of Socket Boxes
Socket boxes, also known as electrical outlet boxes or junction boxes, serve as enclosures for electrical connections, ensuring safety and organization within walls or ceilings. These boxes come in various shapes, sizes, and materials to accommodate different installation needs. Whether it’s a residential, commercial, or industrial setting, socket boxes play a crucial role in providing power to electrical devices.
Contents
ToggleIn residential settings, socket boxes are commonly found in walls to facilitate the connection of power outlets for appliances, lighting fixtures, or electronic devices. They can also be installed in ceilings for light fixtures or fans. Commercial and industrial applications may require larger and more robust socket boxes to handle higher electrical loads or to accommodate specialized equipment.
Importance of Proper Installation Techniques
Proper installation techniques are paramount when it comes to socket boxes to ensure electrical safety and compliance with building codes. Improperly installed socket boxes can pose significant risks, including electrical fires, short circuits, or even electrocution. Here’s why paying attention to installation details is crucial:
-
Safety First: Correct installation techniques minimize the risk of electrical hazards, protecting both property and lives. A securely installed socket box prevents exposed wires and reduces the likelihood of accidental contact.
-
Code Compliance: Building codes dictate specific requirements for socket box installation to ensure structural integrity and electrical safety. Following these regulations is not only a legal requirement but also essential for passing inspections and avoiding penalties.
-
Preventing Damage: Properly installed socket boxes are less susceptible to damage from environmental factors such as moisture, dust, or physical impact. This longevity ensures reliable electrical connections over time.
-
Enhanced Aesthetics: Neatly installed socket boxes contribute to the overall aesthetics of a room or building. Concealed wiring and flush-mounted boxes create a clean and professional appearance, enhancing the visual appeal of the space.
-
Ease of Maintenance: Well-installed socket boxes make future maintenance or repairs more accessible. Accessibility panels or removable covers allow electricians to troubleshoot or upgrade electrical systems efficiently without causing unnecessary damage to walls or ceilings.
By understanding the significance of proper installation techniques, homeowners, contractors, and electricians can prioritize safety and quality when working with socket boxes.
Whether you’re renovating your home, constructing a new building, or simply upgrading electrical systems, investing time and effort into correctly installing socket boxes is essential for a reliable and safe electrical infrastructure. Remember, it’s not just about powering devices—it’s about safeguarding lives and property against electrical hazards.
Preparing for Installation: Assessing the Concrete Wall
Inspecting the Concrete Surface
Before diving into the installation of socket boxes in a concrete wall, it’s crucial to conduct a thorough inspection of the surface. Concrete, though durable, can present challenges due to its hardness and composition. Here’s what you need to consider during the inspection process:
-
Cracks and Imperfections: Examine the concrete surface for any cracks, chips, or other imperfections. These flaws can affect the stability of the installation and may require additional reinforcement or repair before proceeding.
-
Thickness and Density: Assess the thickness and density of the concrete wall. Thicker walls may require specialized drilling equipment, while denser concrete may pose challenges in terms of drilling and anchoring.
-
Moisture Content: Check for signs of moisture or dampness in the concrete. Moisture can impact the effectiveness of adhesives and may lead to corrosion of electrical components over time. If moisture is present, it’s essential to address the issue before installation to prevent future problems.
-
Structural Integrity: Ensure that the concrete wall has sufficient structural integrity to support the weight of the socket boxes and withstand the installation process. Weak or compromised areas may require reinforcement or alternative installation methods.
By thoroughly inspecting the concrete surface, you can identify any potential issues and address them proactively, ensuring a smooth and successful installation process.
Identifying Suitable Locations for Socket Boxes
Choosing the right locations for socket boxes is a critical step in the installation process, as it determines the functionality and accessibility of electrical outlets. Here are some factors to consider when identifying suitable locations:
-
Electrical Requirements: Determine the electrical needs of the space and plan accordingly. Consider the placement of appliances, lighting fixtures, and other electrical devices to ensure adequate coverage and convenience.
-
Building Codes: Familiarize yourself with local building codes and regulations regarding the placement of socket boxes. Codes may specify minimum distances from corners, heights above the floor, and other requirements for safety and compliance.
-
Accessibility: Prioritize accessibility when selecting locations for socket boxes. Ensure that outlets are easily reachable and conveniently located for everyday use. Avoid placing boxes behind large furniture or in hard-to-reach areas.
-
Aesthetic Considerations: Take into account the aesthetic impact of socket box placement on the overall design of the space. Aim for a balance between functionality and visual appeal, choosing locations that blend seamlessly with the surroundings.
-
Future Needs: Anticipate future electrical needs and plan accordingly. Consider installing additional outlets or wiring for future expansion, allowing for flexibility and convenience down the line.
By carefully considering these factors, you can identify suitable locations for socket boxes that meet both functional and aesthetic requirements, setting the stage for a successful installation process.
Gathering Necessary Tools and Materials
Essential Tools for Installation
When preparing to install socket boxes in a concrete wall, having the right tools at your disposal can make all the difference in ensuring a smooth and efficient process. Here’s a rundown of the essential tools you’ll need:
-
Hammer Drill: A hammer drill equipped with a masonry bit is essential for drilling holes into the concrete wall. This powerful tool can penetrate the tough surface of concrete with ease, allowing for precise placement of socket boxes.
-
Screwdriver or Drill Driver: You’ll need a screwdriver or drill driver to secure the socket boxes in place once they’re installed. Opt for a model with adjustable torque settings to prevent over-tightening and damage to the mounting hardware.
-
Level: A level is indispensable for ensuring that the socket boxes are installed perfectly straight and level. This helps maintain the integrity of the electrical connections and provides a professional finish to the installation.
-
Measuring Tape: Accurate measurements are crucial for determining the placement of socket boxes and ensuring they comply with building codes and regulations. A reliable measuring tape allows you to mark precise locations on the concrete wall before drilling.
-
Wire Strippers: Wire strippers are necessary for safely removing the insulation from electrical wires, preparing them for connection to the socket boxes. Look for a pair with sharp, precision blades for clean and precise stripping.
-
Pencil or Marker: A pencil or marker is essential for marking drilling points on the concrete wall. Make sure to use a contrasting color that’s easy to see against the concrete surface.
-
Safety Gear: Last but certainly not least, don’t forget to prioritize safety by wearing appropriate gear such as safety glasses, gloves, and ear protection. Concrete drilling can generate dust and debris, so a dust mask or respirator is also recommended to protect your lungs.
By ensuring you have these essential tools on hand before starting the installation process, you’ll be well-equipped to tackle the job with confidence and precision.
Required Materials for Concrete Wall Installation
In addition to the necessary tools, gathering the right materials is equally important for a successful socket box installation in a concrete wall. Here’s what you’ll need:
-
Socket Boxes: Select socket boxes that are suitable for concrete wall installation, preferably made of durable materials such as PVC or metal. Choose boxes with built-in mounting brackets for easy installation.
-
Concrete Anchors: Concrete anchors are essential for securing the socket boxes to the concrete wall. Opt for anchors specifically designed for masonry applications, ensuring a secure and reliable hold.
-
Electrical Wiring: Depending on the specific requirements of your electrical system, you’ll need electrical wiring to connect the socket boxes to the main power supply. Choose wiring that is rated for indoor use and meets local building codes.
-
Wire Connectors: Wire connectors, also known as wire nuts, are necessary for securely connecting electrical wires within the socket boxes. Make sure to use connectors that are appropriate for the gauge of the wires being used.
-
Cover Plates: Once the socket boxes are installed and wired, cover plates are needed to conceal the openings and provide a finished look. Choose cover plates that match the style and finish of your existing electrical fixtures for a cohesive appearance.
-
Mounting Screws: Depending on the type of socket boxes you’re using, you may need mounting screws to secure them in place. Make sure to use screws that are compatible with the mounting brackets and anchors.
-
Cable Staples or Clips: Cable staples or clips are useful for securing electrical wires to the surface of the concrete wall, keeping them neatly organized and out of the way. Use these accessories to prevent tripping hazards and protect the wiring from damage.
By gathering these essential materials beforehand, you’ll streamline the installation process and ensure that you have everything you need to complete the job efficiently and effectively.
Step-by-Step Guide to Installing Socket Boxes
Marking the Location for the Socket
Before you begin the installation process, it’s crucial to accurately mark the locations where you’ll be installing the socket boxes. Here’s how to do it:
-
Plan Placement: Start by determining the ideal placement for the socket boxes based on your electrical needs and the layout of the room. Consider factors such as convenience, accessibility, and compliance with building codes.
-
Use a Level: Use a level to ensure that the markings for the socket box locations are straight and level. This will help maintain the integrity of the electrical connections and provide a professional finish to the installation.
-
Measure Twice, Drill Once: Double-check your measurements to ensure accuracy before drilling into the concrete wall. Measure from nearby reference points such as corners or existing electrical fixtures to ensure consistency.
-
Mark the Drill Points: Once you’ve determined the precise locations for the socket boxes, use a pencil or marker to mark the drill points on the concrete wall. Make sure the markings are clearly visible and aligned with your measurements.
Drilling Holes in the Concrete Wall
With the locations marked, it’s time to drill holes into the concrete wall to accommodate the socket boxes. Here’s how to do it safely and effectively:
-
Select the Right Drill Bit: Choose a masonry drill bit that is suitable for drilling into concrete. The size of the bit should match the diameter of the anchors you’ll be using to secure the socket boxes.
-
Wear Protective Gear: Put on safety glasses, gloves, and ear protection to protect yourself from dust and debris generated during drilling. A dust mask or respirator is also recommended to prevent inhalation of fine particles.
-
Start Slowly: Begin drilling at a slow speed to create a pilot hole in the concrete. Once the hole is started, you can gradually increase the speed to drill deeper into the wall. Apply steady pressure and let the drill do the work.
-
Keep Cool: Drilling into concrete can generate heat, so periodically stop and allow the drill bit to cool down to prevent overheating. You can also use a spray bottle filled with water to cool the drill bit and reduce friction.
Inserting Anchors and Box Mounts
Once the holes are drilled, it’s time to insert anchors and box mounts to secure the socket boxes in place. Here’s how to do it:
-
Insert Anchors: Insert concrete anchors into the drilled holes, ensuring they are flush with the surface of the wall. Tap them gently with a hammer if needed to ensure a snug fit.
-
Attach Box Mounts: Depending on the type of socket box you’re using, attach the appropriate box mounts to the anchors using screws or bolts. Make sure the mounts are securely fastened to the wall and aligned with the markings for the socket boxes.
-
Check Alignment: Double-check the alignment of the box mounts to ensure they are level and properly positioned. Adjust as needed before proceeding to the next step.
Securing the Socket Box in Place
With the anchors and box mounts in position, it’s time to secure the socket boxes in place. Here’s how to do it:
-
Attach the Socket Box: Place the socket box over the box mounts and align it with the holes in the mounts. Secure the box in place by tightening the screws or bolts provided with the mounts.
-
Check for Stability: Once the socket box is securely attached to the wall, give it a gentle tug to ensure it is firmly anchored in place. It should feel stable and secure with no movement or wobbling.
-
Test the Fit: Before proceeding with wiring, test the fit of the socket box to ensure it is flush with the wall and aligned properly. Make any necessary adjustments before proceeding to the next steps of the installation process.
By following these step-by-step instructions, you can install socket boxes in a concrete wall with confidence and precision, ensuring reliable electrical connections and a professional finish to your project.
Wiring and Connection Process
Routing Electrical Wires Safely
Routing electrical wires safely is essential to ensure a reliable and hazard-free electrical system. Here’s how to do it:
-
Plan Your Route: Before starting the wiring process, carefully plan the route that the electrical wires will take from the main power source to the socket boxes. Consider factors such as the layout of the room, the location of other electrical fixtures, and any obstacles that may need to be navigated around.
-
Avoid Obstructions: When routing electrical wires, be mindful of potential obstructions such as pipes, ductwork, or structural elements within the walls. Avoid running wires through areas that may be prone to moisture or heat, as this can pose safety risks.
-
Use Conduits or Cable Trays: In areas where wires need to be protected or organized, consider using conduits or cable trays to contain and route the wires safely. Conduits provide physical protection against damage and can help prevent tangling or interference between wires.
-
Secure Wires Properly: Use cable staples or clips to secure electrical wires to the surface of walls or ceilings, keeping them neat and organized. Avoid using nails or staples that could damage the insulation of the wires and create safety hazards.
-
Maintain Clearance: Ensure that there is sufficient clearance around electrical wires to prevent them from coming into contact with sharp objects or abrasive surfaces. Maintain a minimum distance between wires and other components to reduce the risk of damage or interference.
-
Label Wires: To facilitate future maintenance or troubleshooting, label the electrical wires with identifying markers or tags. This will make it easier to identify specific circuits or connections without the need for guesswork.
By following these guidelines, you can route electrical wires safely and effectively, minimizing the risk of accidents or damage to the electrical system.
Connecting Wires to the Socket Box
Connecting wires to the socket box is the final step in the wiring process, completing the electrical circuit and providing power to the outlets. Here’s how to do it:
-
Prepare the Wires: Strip the insulation from the ends of the electrical wires using wire strippers, exposing the conductors underneath. Be careful not to nick or damage the wires during this process, as it can compromise the integrity of the connections.
-
Identify Terminals: Inside the socket box, identify the terminal screws or connectors where the wires will be attached. These terminals are typically labeled for easy identification, with markings such as “live,” “neutral,” and “ground.”
-
Make Connections: Connect the live, neutral, and ground wires to their respective terminals in the socket box, following the color-coding conventions for electrical wiring. Tighten the terminal screws securely to ensure a solid connection without any loose wires.
-
Double-Check Connections: Once the wires are connected, double-check each connection to ensure it is secure and properly seated. Any loose or improperly connected wires should be corrected before proceeding.
-
Insulate Connections: After making the connections, insulate them with electrical tape or wire nuts to protect against short circuits and electrical hazards. Ensure that no bare wires are exposed and that the insulation covers the entire length of each connection.
-
Test the Circuit: Before closing up the socket box, test the circuit to ensure that power is flowing correctly to the outlets. Use a voltage tester or multimeter to verify that there is voltage present and that the connections are functioning as intended.
By following these steps, you can safely and effectively connect wires to the socket box, completing the installation process and providing power to your electrical devices. Remember to always prioritize safety and follow best practices when working with electrical wiring.
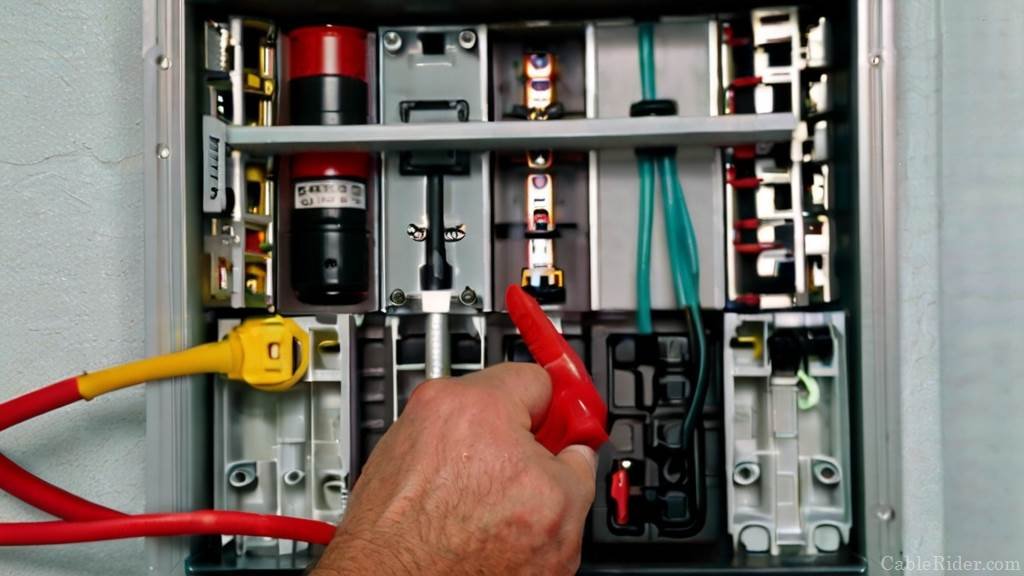
Testing and Troubleshooting
Verifying Proper Electrical Connection
Once the installation of socket boxes is complete and the wiring is in place, it’s crucial to verify that everything is connected properly to ensure safe and reliable electrical operation. Here’s how to verify proper electrical connection:
-
Visual Inspection: Begin by conducting a visual inspection of the socket boxes and wiring to ensure everything appears as it should. Check for any loose connections, exposed wires, or signs of damage that may indicate a problem.
-
Use a Voltage Tester: Test each outlet in the socket boxes using a voltage tester to verify that power is flowing correctly. Insert the tester into each outlet and check for the presence of voltage. A properly functioning outlet should register voltage within the expected range.
-
Check for Grounding: Test the grounding connection in the socket boxes to ensure that it is properly grounded. Use a multimeter set to measure continuity to test for a complete circuit between the grounding terminal and a known ground source.
-
Test Switches and Outlets: If your socket boxes include switches or multiple outlets, test each one individually to verify that they are functioning correctly. Ensure that switches operate smoothly and that outlets provide power as expected.
-
Inspect Circuit Breakers: Check the circuit breakers or fuses associated with the electrical circuit to ensure they are properly sized and not tripped. Reset any tripped breakers and monitor for any recurring issues that may indicate an underlying problem.
-
Document Results: Keep detailed records of the testing process, including any measurements taken and observations made. This documentation can be valuable for future reference and troubleshooting purposes.
By following these steps to verify proper electrical connection, you can ensure that your socket boxes are installed correctly and ready for use.
Troubleshooting Common Installation Issues
Even with careful planning and execution, installation projects can sometimes encounter unexpected issues. Here are some common installation issues and how to troubleshoot them:
-
Intermittent Power: If you’re experiencing intermittent power or flickering lights, it could indicate a loose connection or faulty wiring. Check all connections in the socket boxes and ensure they are tight and secure. Inspect the wiring for any signs of damage or wear that may be causing the issue.
-
No Power: If there is no power to the socket boxes, check the circuit breakers or fuses to ensure they are not tripped or blown. Test the voltage at the main electrical panel to verify that power is reaching the circuit. If power is present at the panel but not at the socket boxes, there may be a problem with the wiring or connections.
-
Tripped Breakers: If circuit breakers are tripping frequently, it could indicate an overloaded circuit or a short circuit somewhere in the electrical system. Identify any appliances or devices that may be causing the overload and redistribute the load as needed. Inspect the wiring for any signs of damage or overheating that may be causing a short circuit.
-
Incorrect Wiring: If you suspect that the wiring is incorrect or improperly connected, refer to the installation instructions and wiring diagrams for the socket boxes. Double-check each connection to ensure it matches the specified configuration and correct any errors as needed.
-
Grounding Issues: If there are grounding issues with the socket boxes, verify that the grounding wire is securely connected to the grounding terminal in the box. Ensure that the grounding wire is properly sized and that there is a solid connection to a reliable ground source.
By systematically troubleshooting common installation issues, you can identify and resolve problems quickly, ensuring that your socket boxes are installed safely and functionally. If you encounter any issues that you’re unable to resolve on your own, don’t hesitate to seek assistance from a qualified electrician.
Finishing Touches and Safety Measures
Covering the Socket Box Opening
After completing the installation of socket boxes and ensuring proper wiring, it’s time to add the finishing touches by covering the socket box opening. Here’s how to do it effectively:
-
Selecting Cover Plates: Choose cover plates that are compatible with the socket boxes and match the style and finish of your existing electrical fixtures. Cover plates come in a variety of materials and designs, so select ones that complement the aesthetic of your space.
-
Installing the Cover Plate: Align the cover plate with the socket box opening and secure it in place using the provided screws. Make sure the cover plate sits flush against the wall and that all screw holes line up properly.
-
Checking for Proper Fit: Once the cover plate is installed, double-check for any gaps or misalignments around the edges. The cover plate should fit snugly against the wall and provide a seamless finish to the socket box opening.
-
Testing Accessibility: Test the accessibility of the outlets by plugging in various electrical devices and ensuring they fit comfortably within the cover plate opening. Make any adjustments as needed to accommodate larger plugs or bulky adapters.
-
Adding Decorative Touches: Consider adding decorative accents or enhancements to the cover plates to further customize the look of your electrical outlets. Decorative inserts, switch plates, or custom finishes can add a touch of personality to your space.
By covering the socket box opening with the appropriate cover plates, you not only improve the appearance of your electrical outlets but also provide added protection against dust, debris, and accidental contact with electrical components.
Ensuring Safety Protocols are Followed
Safety should always be a top priority when working with electrical systems. Here are some essential safety measures to follow throughout the installation process:
-
Turn Off Power: Before beginning any work, always turn off the power to the circuit you’ll be working on at the main electrical panel. Use a voltage tester to verify that the power is off before proceeding.
-
Wear Protective Gear: Wear appropriate safety gear, including safety glasses, gloves, and ear protection, to protect yourself from potential hazards such as electrical shocks, flying debris, and loud noises.
-
Use Insulated Tools: When working with electrical components, use insulated tools and equipment to minimize the risk of electrical shock. Insulated screwdrivers, pliers, and wire strippers provide an extra layer of protection against accidental contact with live wires.
-
Avoid Overloading Circuits: Be mindful of the electrical load on each circuit and avoid overloading outlets with too many devices. Distribute the load evenly across multiple circuits to prevent overheating and potential fire hazards.
-
Inspect Wiring Regularly: Periodically inspect electrical wiring for signs of wear, damage, or deterioration. Replace any damaged wiring promptly to prevent electrical faults and potential safety hazards.
-
Follow Manufacturer Instructions: Always follow the manufacturer’s instructions and guidelines when installing socket boxes and electrical components. Pay attention to recommended installation methods, wiring configurations, and safety precautions to ensure a safe and reliable electrical system.
By following these safety protocols and best practices, you can minimize the risk of accidents and ensure a safe and successful installation of socket boxes in your home or workspace. Remember, when it comes to electrical work, safety should always come first.

